One feature of the Porsche Boxster is that it has two trunks, one in front and one in back. The front trunk is very deep and can hold an entire ice chest with room to spare. The back trunk is wider but shallower, and was designed to carry golf clubs, I've heard of people putting in two sets of clubs.
However, there are many things that the car can't normally carry because there is a definite limit to the dimensions of the trunks. If an item is too long and wider than a golf bag, then it probably won't fit.
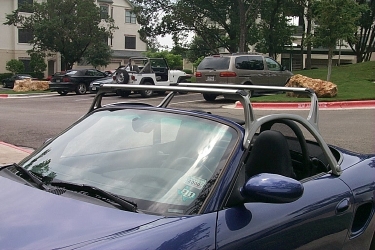
Porsche was not willing to let that go without a solution. They designed the Roof Transport System, or RTS, to be a removable roof rack. You can install a bike rack, ski rack, or luggage carrier on it. The RTS is a bit pricey, about $500 or so, but I'm sure will prove invaluable in time.
Dennis Schøler Pedersen has a really nice website dedicated to the RTS. He shows how you can fit other brand carriers on the RTS.
I bought the RTS to go with my new Boxster, and found that the installation instructions that come with it are a bit lacking. It's not hard to install, but parts of it are confusing. With a Porsche, one can be nervous about doing something to ruin the car.
I'd like to recommend another option to any boxster owners out there. If you need a bike rack for frequent use, and don't need a luggage carrier, then I highly recommend you consider an alternative method proposed by Karl Schneck. This is a combination trailer hitch and bike rack mount. I haven't seen it in person, but the concept looks sound. Caveat emptor.
Since I was so confused, I figured others might be as well, so I made this little page to show how to put it on. It took me about two hours of fiddling to figure it out and do it, but I expect the next times should probably take about 45 minutes. I don't plan to use this very often. Ready? Here goes. . .
1. Take the stuff out of the box. I didn't get a box (mine was supposed to be a demo for the sales floor, so they didn't have the box anymore) so you'll have to figure out that on your own.
2. Take an inventory. You should have two Support Elements (those aluminum arches, one right and one left), two Support Tubes (one has a rubber strip along an edge, but no one has been able to tell me why), and a box with lots of parts in it. Be carful not to open it upside down. The top has no writing, the bottom side has numbers and such molded in it.
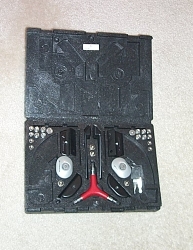 .
.In the kit you'll see a bunch of screws, brackets, and such. Here's a list:
2 Keys
1 Coded Socket
1 Three-way socket wrench (with red handle) (Newer versions come with a different tool.)
2 A-Pillar brackets
2 B-Pillar brackets for soft top
2 Coded Safety screws
2 B-Pillar brackets for hard top (not used in these instructions)
4 Flanged button head screws for hard top (not used in these instructions) (torx)
2 Large Counter Sink screws for mounting the Support Element to the A-Pillar (hex)
8 Pan head screws with washers for attaching the Support Tubes to the Support Elements (hex)
4 short counter Sink screws for mounting A-pillar brackets to the A-pillar (torx)
4 tall counter sink screws for mounting the B-pillar brackets to the B-pillar
Now that you've inventoried everything, here's how you do it.
1. RTS Installation - Starting
Off
2. RTS Installation
- A Pillars
3. RTS Installation
- B Pillars
4. RTS Installation
- Installing Arches and Finishing Up
5. RTS Accessories
6. Bike Rack Details
If you note any errors or omissions, please let me know.
Back to Skyler's Home Page