Okay, we're on the home stretch.
Everything else is fairly straight forward, but you've got the
biggest risk of scratching your paint. Don't worry, though. It's
not that hard to be careful.
Here I should say that Porsche supplies some cardboard cutouts to help protect your paint. I didn't get them in my kit, but they didn't seem too necessary. Use them if you have them.
Run the bolts through the mounting brackets before putting the arch on, to clean out any paint and dirt in the threads. You don't want to be futzing with getting the screw started while you're trying to hold the arch up off of your paint.
The arch rests on the B-Pillar without being watched, so you can screw in the top of the arch to the A-Pillar easily. Use the large counter sink screw. Then use the funky coded screw with the large flange and Porsche logo to screw the arch into the B-Pillar. You need to use the coded socket. Here's what they look like when they're installed.

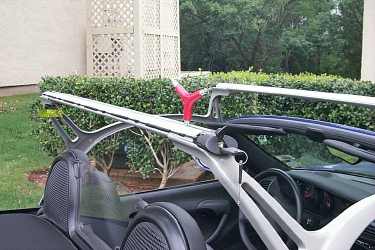
Now you're home free. All you have to do is install the tubes. Before you do that, I recommend that you run the bolts through the screw holes to clean out any paint or stuff in the threads. Some are hard to get started the first time, and you don't want to mess with that while the tube is on.
They've got a wierd way to lock in the tubes. Take a look:
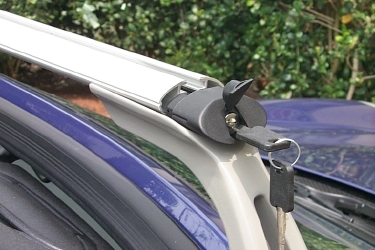
You put the key in the keyhole, and turn and pull the plastic end cap back. This exposes the screwholes, where you'll be putting the bolts in. A better design would have been to have captured bolts so you don't have to drop the bolts into the holes and fiddle with them when you pull them out. But they didn't build it that way. What does this mean? It means this part is pretty risky for your paint job. (Note: A correspondent has informed me that these bolts are now held in place by rubber o-rings, maybe Porsche is listening!)
Anyway, you just screw the bolts in, then lock it up. Make sure that the lock catches the locking tab. That's too hard to show in a picture, but you'll see it plainly enough.
I recommend that you screw one end of the tube in loosely, then start the screws in the other end and tighten them, and then return to tighten the first end up again. This will help when you align it.
Also notice that the tube in back has a rubber gasket for some reason. The other tube doesn't have this. I don't know what it is for, nor which position or orientation it's supposed to have. If you figure it out, let me know. (Note, a few correspondents have chastised me for not reading carefully enough. The rubber gasket goes to the leading edge of the forward tube, but I still don't know why.)
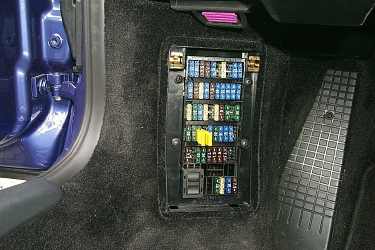
Now the last step. Once the RTS is on, you cannot change the position of the soft top. Therefore, to prevent accidentally moving the soft top, you should pull the fuse for the convertible top motor. It is fuse number 3, row D as shown below. Just pull it out using the yellow tool, and stick it in the bottom with the other spare fuses. (Actually, you might want to make this the first step!)
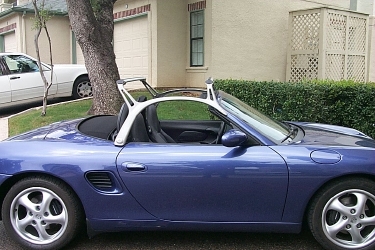
So now you're done. Be careful driving, it makes a LOT of noise and whistles, and with a load the car doesn't corner anywhere near as well as it did before. Good luck!
Now that you've gotten the RTS installed here's some pictures of the bike rack and luggage rack.
1. RTS Installation - Starting Off
2. RTS Installation - A Pillars
3. RTS Installation - B Pillars
4. RTS Installation - Installing Arches and Finishing Up
If you note any errors or omissions, please let me know.
Back to RTS Installation
Back to Skyler's Home Page